ImageMagick
Tutorial Templates
(Teaching Templates)
(with Mr. C's approval)
|
|
ImageMagick
Tutorial Templates
(Teaching Templates)
(with Mr. C's approval)
|
|
|
Compositing a animated clear background sparkle image over another to give it a starry twinkle effect. Isn't often easy to achieve. Using this method you will get much better results. The problem usually is that sparkles over the lighter parts of the image are too dark, even black. Not what we wanted at all. I take this base image to a ImageMagick of my choice. Then take it to the composite filter.  ... 5 k ... 5 k
I composite checkmarking the tile across and down the image canvas using the default of "Over". This image that I put together. It is 3 frames:  ... 3 k ... 3 k
When I 'Output' I remember to change the extension to .gif from jpg. Then I save to my webspace. Here is that result. Booo huh?  ... 81 k ... 81 k
Now try using "Blend" for composite instead of "over" Notice how the sparkles take on the color of the background they are on? Take a look at the sparkle to the right of the lion's nose. Also the sparkle to the right and above her feet. Much better! Completed Image:  ... 82 k ... 82 k
I put a black border around the base image so you could clearly see that using blend when compositing will blend the animated image with both light or dark colors in the base image. Yes the kb's are up there! No I did not optimize. That is a subject for another tutorial. Yes I would automatically optimize as soon as I output. Another sparkle 29x29 2 frames under 1kb Optimizing is a subject with many methods, tips and tricks. It is a go by feel manipulation. Every image reacts differently. So there is no way to teach a solid method that will always work. Because there isn't one! Try this! Make a gradient tile before you enter the Magick Studio. I used the color names of darkcyan-snow. Composite blend the winkle animation. You have a nice sparkling / snowing background. Another example I talk about and show results of a bit of optimizing. I took this image that I made with my Wine Glass Tutorial to ImageMagick and Blend Sparkled it. 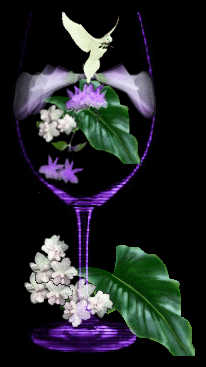 ... 9 k ... 9 k
I composited the Sparkle using blend one time placing it Gravity North West Offset +15+25. Before I output I took it to Colormap. I put 128 in the textbox. I unchecked Dither. I checkmarked Preserve Transparent pixels. Then I output  ... 78 k ... 78 k
I took the above image to Gifworks. I resized it smaller. Then I reduced the amount of colors. I selected the last screen. Which is this image below. It is 15 k.  .... 15 K .... 15 K
|
|
To composite your image, press Browse and select your image file or enter the Uniform Resource Locator of your image. Next, choose the location of the composite image and the type of composite operation. Finally, press composite to continue. |
This tutorial written courtesy of:
![]()
![]()
Becky has really taken off with this method. She has created many beautiful "Sparkled Images" as name tags for you to customize with your name. Please enjoy her tutorial on this method located here:
How To Add "Sparkles" To An Image
"Together discovering the Magick one wonder at a time"

ArborHosting ImageMagick
01/05/2006
Please continue to support our sponsors of
Mr.C's GREAT Online Imagemagick Studios